Lightning Fast Shipping
Old-Fashioned Customer Service
Competitive Prices & Qty Discounts
Commercial Grade Products
My Cart Id is 57997797
You have no items in your shopping cart.
RSS

Blog posts of '2016' 'September'

How to Wrap Trees with Mini Lights for Christmas

Wrapping trees with mini lights is a creative way to create bright, eye-catching Christmas lighting displays that will stand out.

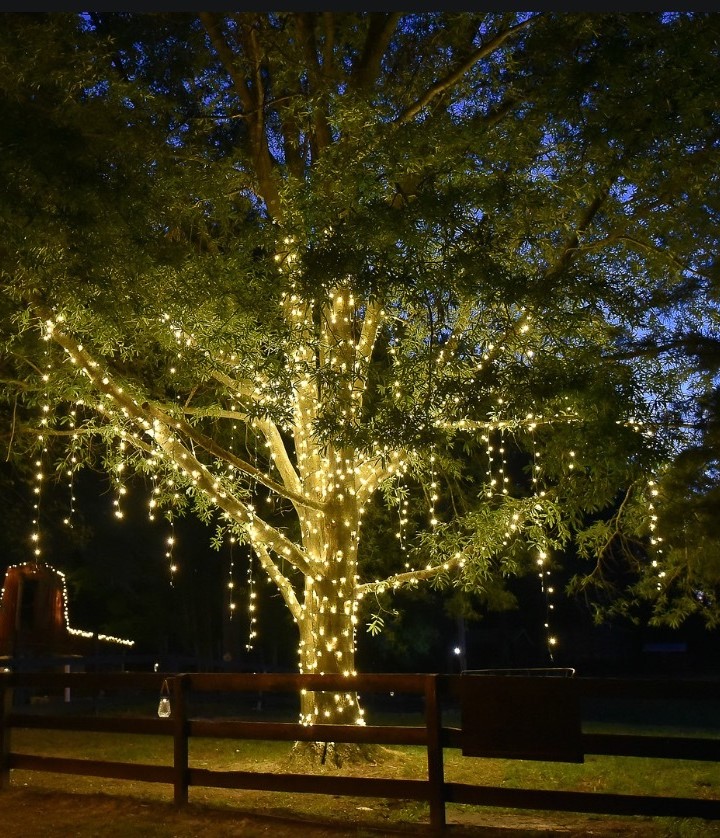
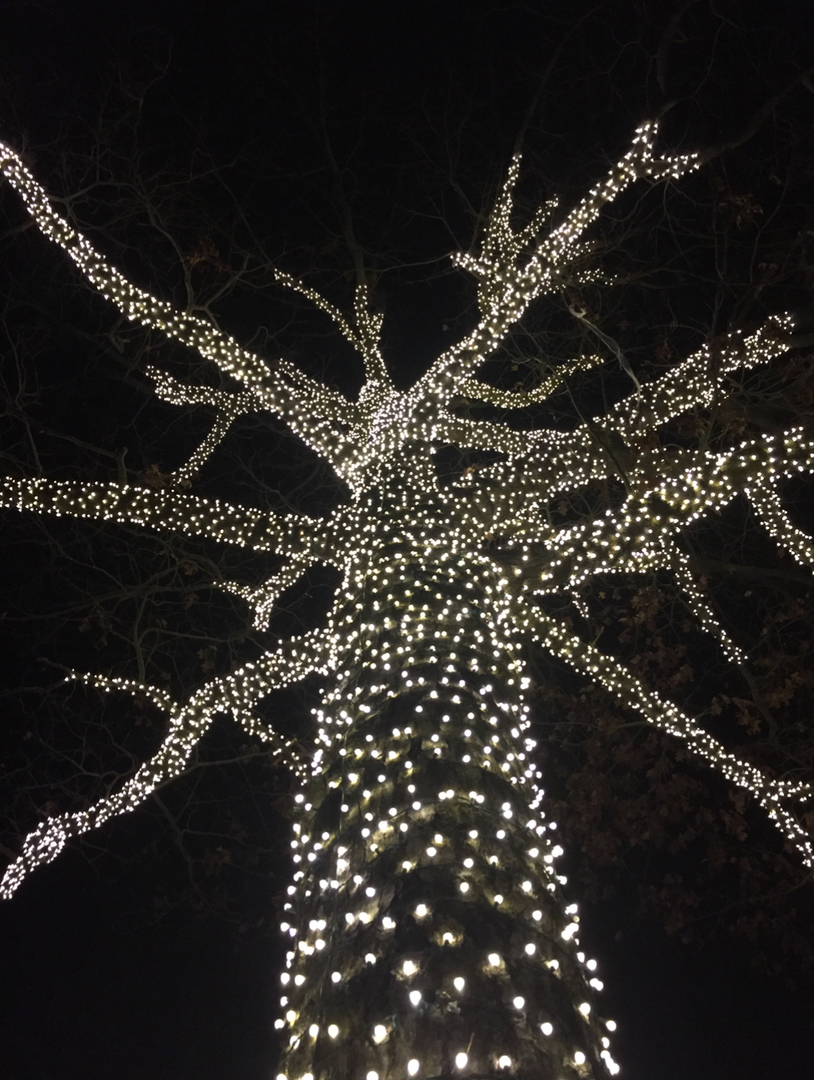
Choose wide angle LED mini lights for the brightest, most energy efficient, and long-lasting display. Here’s how to wrap trees with mini lights to create a luminous light display this holiday season.

You don’t need to be a professional to wrap trees with mini lights. In fact, you can get the whole family involved.

If you’re wrapping trees outdoors, make sure you invest in outdoor mini lights. All of Novelty Lights mini lights are rated for indoor and outdoor use. They will not fade or break in cold or adverse weather conditions.  When you begin, unwind the mini lights and look for the male plug so you can plug in the lights when finished wrapping your tree.

You also need to determine the length of mini lights that you need for your tree. Depending on the width of your tree and how tall the tree is that you want to wrap, you will likely need to use several strings. Be sure to double check the maximum number of strings that you can connect of the lights you purchased. If you are using LED mini lights, you can connect 20+ strings together with no problems. Each product on our website has the maximum number of connected strings listed under the specifications.


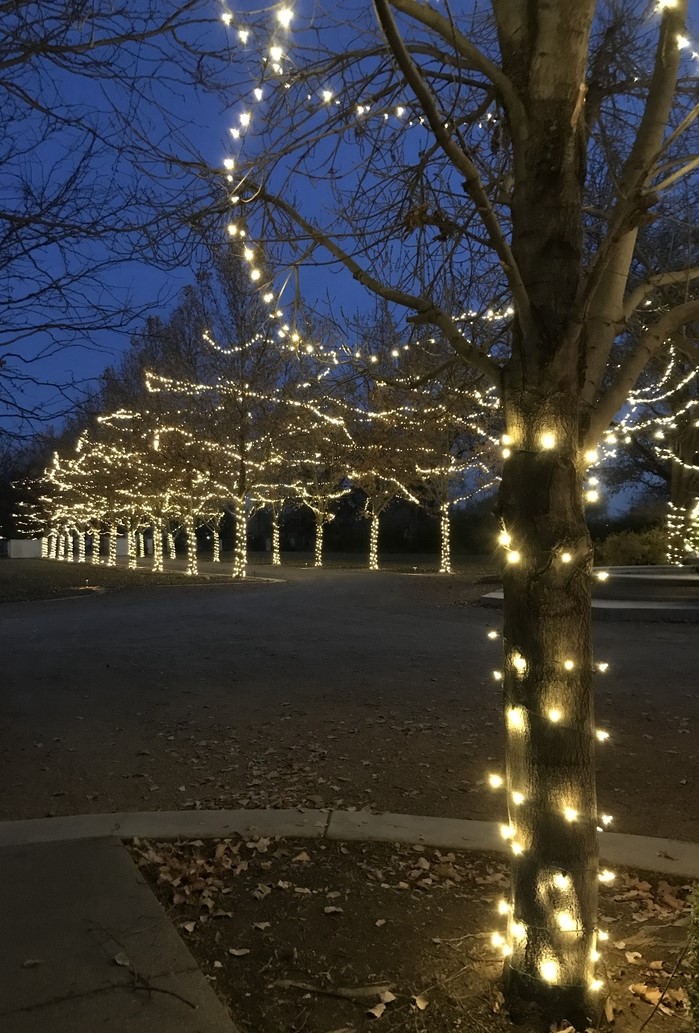
Follow these easy steps to get you started.  

To make wrapping the tree incredibly easy, ball up the strings of lights. Start with the female end and wrap the lights around and around to create a ball. Alternately, we sell mini lights that are already in a ball, our Coaxial LED mini lights (sold by the case). We recommend starting from the bottom of the tree and working your way up. Start by wrapping the trunk of the tree, wrapping the mini lights firmly. You want to avoid wrapping them too tightly because you may need to adjust the lights in areas or swap out bulbs if one burns out. You also want to avoid wrapping the tree too tightly to give it room to breathe, especially outdoors.  

When you reach branches on your tree, you want to wrap the same way you did around the trunk but leave enough space so that you can wrap back towards the trunk after reaching the end of the branch. You don’t need to wrap all of the branched, and you only need to go about ¾ of the way up a branch for maximum effect.

Once you have reached the top of your tree, you’ll begin wrapping down the trunk of the tree, if desired. Doubling up on the mini lights on the trunk to create a brighter effect for the tree. When you’ve finished wrapping the tree, plug in the male plug you left at the bottom and enjoy the light show!

Novelty Lights Mounting of Outdoor String Lights Recommendations

Make your ambient string lighting look professional while creating a relaxing atmosphere with Novelty Lights.  Using support guide wire to hang outdoor string lights is a relatively easy home improvement project that anybody can tackle! 

When hanging Novelty Lights outdoor string lights, there is more to it than throwing them up and over trees, lights, and other fixtures. If you want to get the full look and feel of string lights, you have to plan just how they will hang over your yard, porch, or another area.  By using guide wire, you properly secure

Hanging outdoor lights   

your  string lights for long-lasting use. Let’s look at how to use guide wire to hang outdoor string lights.

Using Guide Wire to Hang Outdoor String Lights

In order to use guide wire to hang outdoor string lights, you’ll need to invest in some support wire, screw hooks, eye bolts, cable seals, or snap hooks. We generally recommend “aircraft wire” to be used as your support cable.  A typical wire thickness you would use for your aircraft wire would be 1/16”.  You’ll be able to find these items at your local home improvement store and depending on your application you may need all these items or only some.

In preperation for installation. 

Before you begin, your outdoor string lights will have instructions for how many strands of lights you can connect to one another. Make sure you follow these instructions for safety reasons. If your string lights do not come with premade eye lid holes specifically made for support wire then you will need to use cable ties or zip ties to secure the lights to the support wire.                             Hung light

   Light hung


You’ll use the screw hooks or eye bolts along with snap hooks to create anchor points for your support wire. Every application is different but some examples of anchor points are porch roofs, pergola support beams, trees, light posts, and other stationary objects can be great anchor points for hanging outdoor string lights.  You can even install poles in your yard and feel free to get creative about hiding them in shrubbery to mask them to hang your string lights.

In order to install the guide wire, you will make a loop with the support cable and use a cable seal to secure the loop. Next, you will attach the secured loop to a snap hook.  From there, you will take your snap hook and attach it to your mounted screw hook or eye bolt.   You will then continue to secure the guide wire to various pre-mounted anchor points throughout the area to get the desired look and feel.  You’ll then move from anchor point to anchor point throughout the area to hang your outdoor string lights.      Example HookSnap hooks

Support cable Example Support Cable Eye bolt Example Eye Bolt Cable seal

Example Cable Seal